Sunday, January 30, 2011

Collar Tutorial

Some of you have requested a tutorial on how to make collars, so here it is :) 
I've done my best to make it as easy to understand as possible. I haven't actually done a tutorial before, so let me know if there are bits you don't understand...


Step 1: Print out the above image as A4 sized (21cm x 29.70 cm). Cut out the two shapes and place on the fold of your paper pattern. Add to or decrease the length of the collar within the red arrow area. Cut out your pattern and open the fold to reveal the full shape. 


Step 2: Fold your chosen fabric(s) so that you have two layers with the right side facing each other. Pin your patterns to the fabric(s) and cut out. You should have two pieces in each shape, as above. If you haven't altered the length of the collar, it should be about 48cms along its straight side.


Step 3: Sew the two pieces of the collar together on the three straight sides, right side facing inwards. Cut the corners of the collar and turn the collar inside out so that the right side of the fabric is facing outwards.


Step 4: Iron the seam flat. This will make it easier to do the next step of ironing the outside of the collar down flat.


Step 5: Cut out a strip of fusible web. Position it inside the collar and iron according to the fusible web instructions. This will give the collar a stiffness. At this point you can also choose to sew a seam along the collar or leave it, as you please.


Step 6: Place the layers for the pieces of neck fabric on either side of your collar piece, facing right side inwards.


[click on image to enlarge]

Step 7: Sew the neck pieces to the collar. Use pinking shears to cut the curved edge of the neck piece and collar that you have sewn together. Sew the ends of the neck piece together. Turn inside out and iron the neck fabric down flat.


At this point I usually iron a hem on the length of each neck piece. Then I position inside a strip of fusible web, iron the fabric together and sew along the edge. This is quite fiddly and difficult, so I've provided an alternative below which is much easier...


Step 8: Iron a hem on your neck fabric, insert a strip of fusible web and iron. At this point you can either  turn your hem and sew it, or cut out a strip of fabric and sew to exposed edge and turn and sew down on the reverse side in much the same way as you'd attach some bias binding.


Step 9: Iron along the join of the neck piece to the collar so that it will sit correctly... And, there's your collar!


Step 10 is, of course, devising a way to attach the neck piece at the front. I've been playing with buttonholes, clips, brooches and ribbon (not always successfully). If you come up with a great idea, I'd love to see it :) Have fun collar making!


GIVEAWAY!
If you'd like to win this collar then let me know in the comments section. I'll be leaving it without any clip or attachment (so you can have all the fun with that one!) I'll do a random number selection for the winner  next Sunday 6th February.

Friday, January 28, 2011

The Old-Fashioned


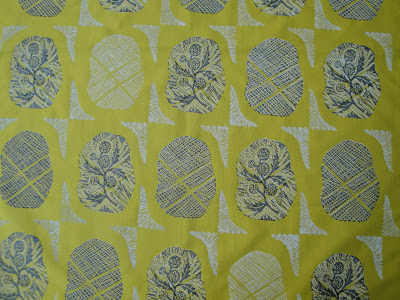
I'm working on some new fabric designs. For some reason, this always feels better working off a tea towel ;) I don't think this one is going anywhere in it's current form, but it's given me a lot of ideas as to what works etc. Anyway, I've called it "The Old-Fashioned' in my mind because it reminds me of some strange 1940s design with a 1950s twist... maybe I should have called it 'the confused'? ;) Have a great weekend!

Thursday, January 27, 2011

M.C.S - Blundering Buttonholes (Batman)

I'm playing along with Kirsty's My Creative Space meme today. Visit Kootoyoo to see more spaces or to join in yourself.


Do you remember the collars? I was thinking of ways to attach them and decided on a simple buttonhole. What could be more straight-forward and less worthy of a drama-packed episode of Batman? Alas, it was not to be... I think the word is 'adequate' :(


Can someone tell me or direct me to a site that explains how to use the automatic buttonhole foot on a Janome? I thought it'd be so simple - you attach the foot and place your fabric and off you go.... Nope, it's "Blundering buttonholes, Batman!"


See you next week... same Bat-time, same Bat-place! ;)

Sunday, January 23, 2011

Inspiration: Abigail Reynolds


While researching a post for my other blog I came across the amazing crochet installations of London-based artist Abigail Reynolds.  This is her Grand Mutator piece which started from the pattern for a basic string bag. Her inspiration for the piece comes from the Darwinian theory of evolutionary mutations, where mistakes in the coding cause a progressive change over time. 


Reynolds also cites the 1960s toxicity tests performed on spiders as a key source of inspiration. 


This is her only public crochet installation (that I know of) but you can see more of Reynolds' work on her website.


p.s. I've tried anarchic crochet and I couldn't do it... I just couldn't make myself not follow the rhythm of crochet, if that makes sense? So, there's awe in this post too ;) Have you tried it? What's the secret?

Saturday, January 22, 2011

Rosemary


The Mr is home today. I don't remember the last time he had a Saturday off... so we gardened. Needless to say, I don't remember the last time we gardened either ;)


We have four rosemary bushes that are almost trees, they are so lush. Lately, they've been dying off in strange clumps within the bush, so we decided a bit of pruning was in order... This is about half of the harvest. 


The girls and I set about stripping the leaves... I plan to bag them and... well, actually I'm not sure. 
Is there a knowledgeable herb-ie out there who knows what I should do with them? Can I freeze them or should I set up a giveaway table on the street..? Any suggestions welcomed :)


p.s. I've just found this link to freezing rosemary and other herbs in case anyone's interested :)

Thursday, January 20, 2011

My Creative Space - Crochet Skirt

It's my first week up and running with Kirsty's meme My Creative Space. Visit Kootoyoo to join in or see other spaces :)


Just before xmas, I saw this crochet skirt in one of Jo Sharp's pattern books and decided to have a go myself. At that time I was still totally intimidated by the crochet pattern symbols and thought I'd just 'wing it', so....


I crocheted a pile of navy hexagons in Jo Sharp's Desert Garden Aran Cotton (Nightsky) and joined them together to form a round tube. I have yet to crochet the waistband - I thought I'd do a few lines of double stitch and have a drawstring going through it. Also, I want to line the skirt in a navy stretch cotton I think... I'm not really into the breeze-through look! ;)


Happy new start to Creative Spaces :)

Tuesday, January 18, 2011

Reading crochet

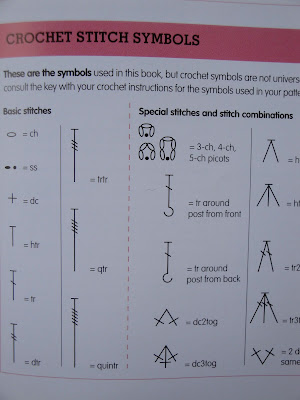
This wonderful book was a treat for myself for xmas. I've had a silent wish for a looong time now, ever since I first learned how to crochet. I've really wanted to learn how to read crochet... 


... you know, those funny symbols? All the lessons I've had have been either in person where you are shown or via great tutorials, like on Lucy's blog, Attic 24, where words and pictures guide you through. Anyway, I thought it was about time - if I can crochet a blanket I should be able to read a pattern... don't you think?


While we were away this was my goal.
First try was the Open Shell Stitch lace pattern...


Next, I tried the Bold Scallop Edging pattern.


They're not totally accurate but I like them, and it's a start.

No.1 New Year's Resolution complete :)
(tick that box!)

Sunday, January 16, 2011

We're fine :)

Firstly, big apologies and thank you to everyone who emailed and phoned to see if we were okay during the Brisbane floods! I'm so sorry you worried about us... we were at a lovely cabin in the rainforest without mobile access and not even bothering with TV. We had NO IDEA about what was going on! Thankfully, our home was not affected but this is a photo of another street in our area...


photo credit: Michelle Smith


I feel guilty that we were so high and dry and totally oblivious. I hope all the other bloggers in Australia affected by these floods are okay. Thanks again to everyone who was worried about us... I have a few emails to get through but I will be in touch soon :)


Friday, January 7, 2011

Making Collars


I seem to have caught a collar-bug... I can't stop making them ;) Started off with the white one below and modified them from there on. I'm still thinking about ways for them to clasp at the front... in the meantime I'm going back to my machine to make some more :)

Thursday, January 6, 2011

Inspiration: Tina Frey


I have a 'thing' for collars... I've always loved them; their neatness and instant structure to any outfit. No surprises then that I am utterly in love with the resin collar collection by Tina Frey Designs. Part of the attraction, of course, is that each piece is individually sculpted and hand finished. It seems, short of flying to San Francisco, it's quite difficult to find them... but you can visit Tina Frey's website or blog to see more of her beautiful work :)


In case you haven't already guessed, these pieces have been a huge source of inspiration for me... I've been making collars :)